Saturday, December 8, 2018


Our Christmas Project…


As many of you know, Jim and I love to decorate the tables for our church’s monthly pot luck dinners. We try to make our centerpieces interesting and attractive for our congregation.  Over the years, we have used beautiful store-bought silk flowers for all sorts of arrangements and in a variety of containers. We’ve had back-to-school themes, special holiday arrangement, a Farm Tractor display (collectibles and hand-made), and recently used a “fishing” theme. Last June, Jim did Fantasy Birdhouses out of logs with the bark still on them (see the June 8th article).

This month, we did a little “borrowing” from the older way of life on the farms and ranches. When it was late fall and continuing well into winter, long, wooden horse-drawn sleds would be filled with gain or straw and taken out to the fields for their various herds. Sometimes they used these long sleds to transport fire wood and even their perfect Christmas Trees.

Jim’s version is a little smaller (a little more than 2 foot long). He used an assortment of various woods. He designed slightly different animal head runners for each of the 4 “sleighs.” Figuring the angles for the sides was a little more of a challenge, and then to fit the ends! Wow! I am always amazed what he comes up with, without a set of blueprints. We decided to add candles for each sleigh and again, he put his magical lathe to good work.


When he finished, I started searching through my holiday décor stash and also a visit to Joann’s. I stuffed each one with a vast variety of evergreen and berry picks, frosted and glazed fruits and many different sizes of pine combs. It was so much fun.

As I look at these sleighs, I am envisioning them sitting on fireplace mantels or long dining room tables.


Well, 2018 is rapidly coming to a close. It has been an interesting year that had many ventures. It was filled with joy and a little sorrow. But mostly, it was filled with love, excitement and wonder. 

Thank you for joining us through this blog and Facebook. Hope you pop in next year – never know what you will fine here.

At this time, Jim and I would like to wish you and yours, a most wonderful and beautiful Christmas.


May God Bless You Always


.


Friday, November 16, 2018


Glitter, Glitter, Everywhere!!!

“Oh, the weather outside is…” actually it is delightful. We’ve had a picturesque but light snow today and a sparkly, multicolored, glittery blizzard “all through the house!”

Actually, that might describe a majority of our crafter-friends’ homes for the next few weeks. Christmas card-making projects, gift wrapping paper, ribbons and more, scattered all around your home. Oh yes… “it’s the most wonderful time of the year!”

One of my projects has been creating poinsettia place cards for our December Pot-Luck with our church family. I doubt if there was a glitter-free room anywhere in our home. We sparkle almost everywhere!

Meanwhile, this week, doing his part for the December gathering, my husband, Jim, is starting his woodworking projects for the centerpieces. Can’t wait to see what he comes up with.

Today’s project was inspired by a technique from Elizabeth Craft Designs. Els showed her die cut poinsettias using her double-sided adhesive tape sheets, sandwiched between velum and a layer of micro fine glitter. For my project, I did some using velum as a base but also used some of my pearled paper scraps as the base. The glitters come in a beautiful variety of colors so I had fun “playing” with different color idea combinations. The technique is simple yet the results are exciting!  

Well, Thanksgiving is not that far off and I really need to de-glitter my home before next Thursday. Wonder where I left the vacuum?

Till next time…
We wish you and yours, a beautiful and safe Thanksgiving.                                                                                              May God Bless You All.

PS - when I finished this project, I had made about 80 poinsettias! Not bad for only having 1 arm. 

Tuesday, November 6, 2018


A Birthday Flower…


Isn’t autumn beautiful? Our yard looks like a lovely carpet of golden yellows, bright rusty shades and soft yellow-browns with just a touch of fading green. The air smells fresh and is just starting to get that little nip to it. Autumn, the second spring!

This week, I would like to share with you my latest Flowering Birthday card. It is for a beautiful young woman celebrating her 30th birthday.

The Flower: I die cut 6 layers of the two larger petals from Lady E's Flower #2 set. Using daubers, I accented the edges and centers with Gelato's Red Cherry. When I scrunched the petals, the Red Cherry coloring softened to a lovely soft pink – exactly what I had wanted.

The Sepal: I cut two of the larger sepals from a dark green Foamiran and accented with Chocolate and Lemon Gelato's. (When assembled, the completed flower measures a little under 3” in height.)


If you look hard, you can see an unbranded mandala die cut, cut out from a pearled green paper. By luck, in my paper stock I had some pale pink pearled cardstock which I mounted on the white card base.


Well, that is it for today. Hope you are having a wonderful day. Christmas is not far off and it is time to get those cards ready.


Till next time,


May God watch
 over you and yours.


Wednesday, October 24, 2018


Autumn Anniversaries…


Well, I just realized that I have not posted lately. As a friend of mine has said, “Life just got in the way!”

As you may realize, I’m rather hooked on Foamiran flower making. Just seeing the reactions from those who receive one of these creations is extremely heartwarming. Like most who enjoy creating, no matter what we create, we do these items out of love and respect for others.


This month, two couples are celebrating 60 years of married life. What an inspiration they are to all of us who know them.


Thank you for stopping in today. May the rest of your Autumn be filled with sunshine, happiness and lots of love.


Till next time,


May God Bless You Always…


Thursday, September 6, 2018


Retiform Part 1…

Finding ideas to create a more masculine card front can be a challenge for most of us. I know, as I’m one of those who lacks that imagination.  (Most men do not want the dimensional flowers that I love to create!)

While I was pondering my most current male related challenge, a friend asked about the name of a specific technique. Well, my old mind had one of those long "senior moments." 

At any rate, we finally determined that she was searching for the term “Retiform.” I remember trying to do a Retiform card a few months ago but was not satisfied with my results. Like most of us, I really do not like not being able to accomplish what should be easy. So, this week, I decided to relax and try again. I really feel confident that this finished birthday card has been a successful challenge.  


·         The bird stamps are from Stampin’ Up.
·         The sentiment was part of one of Whimsy’s Stamps, Paper Door collections.
·         All the inks used are by Gina K.
·          
Thank you for stopping by today. Hope you check out Retiform Part 2. 

Please remember: There are numerous ways to achieve a Retiform card front. Mine is not the only way, nor will I call it my original technique as this technique has been around longer than I have.

Again, Thanks for stopping by.
May God Bless You always.  


Retiform Part 2…


My description of Retiform is to incorporate different shapes to create a unique, freestyle-quilt-like pattern. I sometimes think of it as having no rhyme or reason.

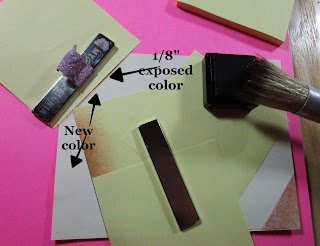
Pictured here is a step-by-step photo tutorial of a very easy, monochromatic background. All you need is paper, Post-It notes and ink.


What do you think? Will you be giving it a go?


Till next time,

May God Bless You Always


Monday, August 20, 2018


Influenced by Susan’s Garden…

A few years ago, I was entertaining the notion of taking my A2 cardmaking to a different level and direction. It was then that I stumbled upon an article within the Chameleon Pen’s e-newsletter showing the outstanding paper flowers by Susan Tierney-Cockburn. Wow! So extremely impressive.

I searched Susan out on Facebook and You Tube and continue to be amazed by her talents. (What I first found interesting is that she only designs dies. It is up to you to give the flowers shape and life.) She is the reason I have challenged myself to study and create flowers.


Last October, Susan presented a project entitled Southern Magnolia, Y’all! That tutorial has intrigued me ever since. I have been collecting her dies for the last few years and realized last week that I actually had all the ones she used for that project…I just had to give it a go.

First, let me direct you to Susan’s original tutorial: https://stierneyc.wordpress.com/2017/10/. Impressive!

For the most part, I followed her technique. The only major changes I made were to use White Foamiran for the flower and Stickle’s Rose Gold for the berries.

I do wish Susan lived closer as I would be visiting her studio regularly. For now, I’ll have to settle for her weekly FB/YT classes. If you had trouble finding her site, go to Elizabeth Craft Designs and look under Susan’s Garden Spot.

Thank you for dropping in today. I’m really excited with my results, but mostly with the chance to express my admiration for a gifted lady and her love for flower creations.

May God Bless You and Yours.  


Friday, August 17, 2018


In Our Thoughts…


Welcome! Thank you for dropping by. The coffee pot is on, so pour a cup and relax for a few.

Today’s card was designed for a new friend and his family. We wanted them to know that our thoughts and prayers were with them during this difficult time in their lives.

Sympathy cards are the most difficult for me to create. Usually, I stay with a more traditional appearance.

As a rule, when a specialty cards is needed, Jim and I will talk about the style of cards we send. Since I did not feel comfortable with the results of my first, more traditional card, I asked Jim for help.  That was when he suggested that our new friend might appreciate one with my flowers.


Flower – White Foamiran die cut using the Sweet Peony die by Heartfelt Creations. The petals were accented with Gelato’s Pistachio.

Leaves – Light Green, Indian Batik papers from USArtQuest, cut with Sizzix’s Garden Greens die.

Top layer background – Green Felt like paper (source unknown)

Cardstock – Elizabeth Craft’s White Soft Finish.

Mandala Shaped laser cut chipboard (source unknown) painted with the Vintage Metallic Watercolor paints from USArtQuest.


Again, thank you for visiting today,

Till later,

May God Bless You, Everyone!