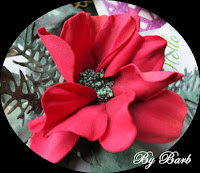
A Rose is a Rose…or a Tulip?
Welcome to My Way. It is so wonderful that you dropped
by. The coffee pot is on so I hope you can stay awhile.
For me, here in Michigan, it has been a snowy, icy and
busy creative week. While preparing a few samples for next week’s Double Tulip Foam
Flower class, a few special birthdays popped up. I decided to include two of
the upcoming birthday cards as samples for the class. This is one.
The die used is one of my favorites. It is a retired Tulip
die by Susan’s Garden. It was one of my first purchased dies a few years ago. For this project I cut 4 layers of White
Foamiran for each of the 3 petal shapes. Then I accented the outer tips with
Barn Door Distress Ink and the inner tips with Scattered Straw Distress Ink.
For the Olive Green Foamiran leaves, I used Lady E’s
Leaves 001. Then accented with Forest Moss and Vintage Photo Distress Inks.
Now the fun part – for the petals and leaves, use a very
low heat setting iron to slightly warm each piece. Remove from the heat and immediately
scrunch each petal and leaf. I try to do an accordion like fold then scrunch
between my fingers.
After that, it is time to open and re-shape each piece. I
prefer working on a very thick but soft sponge, like a thick grout sponge. I
use my ball stylus to slightly smooth out the main body (ball) of the petals
and try to leave the outer tips a little more wrinkled. Same with the leaves.
I did cut a sepal out of a firmer green cardstock. Using
hot glue, start setting the 1st and 2nd petals across
from each other. Now the 2nd and 3rd in-between. Offset
the rest in the same manner. Once the flower has been completed, add a little
hot glue to the center, then drop a pinch of Woodland Scenics' Pollen Yellow to
cover the glue.
 Did you notice the lovely background paper? It’s called
House of Roses #3 by Lemon Craft. Thought the flowers worked well with this
Double Tulip.
Well, that is all I have for today.
We hope you will drop by
again.
Till next time,
May God Watch Over You and Yours.


