Search This Blog

Showing posts with label Chameleon Pens. Show all posts

Sunday, August 25, 2019


Arteza Watercolor Pencils vs Chameleon Alcohol Pens
Applied to
Sift Finish Cardstock vs Watercolor (90 lb. cold press) Paper


First Test:
Elizabeth Craft Design – Soft Finish -White Cardstock
Whimsy Stamps – Dove Art – Himalayan poppy

Paper: My 1st goal was to see how the Soft Finish cardstock would hold up with all the water that would be applied.  I went over some of the portions of the design multiple times with the color and water. When wet, it did not warp. There are a few dimples on the backside but once mounted, they will not show. I’m impressed and recommend you give it a try.

Soft Finish using Arteza: Used a generic water-brush

A024 White Quartz
A052 Pumpkin
A070 Blueberry
A075 Ivory
A094 Emerald
A111 Coyote 

Arteza: This was my first time to use Watercolor Pencils in a very long time. For the last 10 years or more, I basically used my Prismacolor pencils (bought almost 13 years ago) and a blending nub in order to achieve the desired appearance. However, after watching Sandy Parker’s video and several other non-company artists, it was time to expand my creative directions.

I really must admit that I love my results. I could go on about the packaging, the pencil shapes, the clearness for the identifying names, but you have probably heard it all. As for performance, especially on this slightly textured surface, it was exciting. I applied a light pressure to the surface and was pleased with the water blending. I used a little more pressure on the wet area then blended again with the water-brush.


Soft Finish using Chameleon Alcohol Pens: 

Bl6 Royal Blue
OL3 Olive Green
YO3 Warm Sunset
CG8 Cool Gray

Chameleon Alcohol Pens: If you have followed my blog, you know that I totally enjoy us these alcohol pens. They work great wherever I apply them – every type, texture or thickness of paper plus great on Foamiran. Happily, there were no problems with this Soft Finish cardstock. 

I infused the Royal Blue to between a 5 and 10 count for the lighter areas and of course full strength for the darker. Like most of the papers I’ve tried, the alcohol does bleed through but with no textural distortion.

Second Text:
Canson – Watercolor Paper  (cold press) 90 lb. – Aquarelle
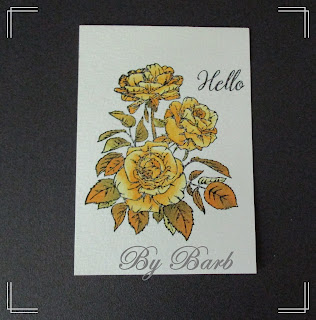
Gina K Stamps – Rose Bouquet
Arteza Watercolor Pencils vs Chameleon Alcohol Pens

Paper: My 2nd challenge was to see how the Canson Cold Press Watercolor Paper withstood the use of a WC pencils with a heavy water application and the alcohol ink. As I said earlier, it has been a long time since I enjoyed the benefits of watercolor.

If interested, there is an excellent article regarding the types of papers that I thought you might enjoy: https://watercoloraffair.com/cold-press-vs-hot-press-watercolor-paper-heres-how-to-choose/.

Cold Press using Arteza:  

A029 Moss
A052 Pumpkin
A064 Yellow Ochre
A100 Pear
A111 Coyote

Arteza: I wanted to use the same application technique as I did with the Soft Finish paper. I did a little extra water blending and occasionally blotted the surface when I felt it was getting too wet. I have used this paper weight with other types of watercolor but because of the WC pencil applications and extra water, the paper warped a little more than I wanted. I will try this again with a 140-300 lb. surface.

Because of the texture (unevenness) of the paper, the watercolor pencil has a softer, gentle appearance. Perfect for so many of our celebration cards.


Cold Press using Chameleon Color Tones:
OL3 Olive Green
YO3 Warm Sunset
Chameleon Color Tops:
YO3 Warm Sunset

Chameleon: Again, I followed my same application technique. However, if you notice I only used two colors for the entire project. Using the infuser with the Warm Sunset  do a 5-8 count. Reapply full strength for the more intense Warm Sunset. The leaves were infused with the Warm Sunset onto the Olive Green. I’m really impressed with this appearance.

MY RESULTS: This was a fun project. I learned a great deal about both types of surfaces and the color applications. Do I have a favorite? I can’t really say. Love both.


Thank you for stopping by today. Hope this might help when thinking about the next card on your list. Now for me, it’s to complete the projects.

Till next time … God Bless Each of You.


Wednesday, July 31, 2019

Extracts from:


The Bridge


I stood on the bridge at midnight,
As the clocks were striking the hour,
And the moon rose o'er the city,
Behind the dark church-tower.

I saw her bright reflection
In the waters under me,
Like a golden goblet falling
And sinking into the sea.

How often, O, how often,
In the days that had gone by,
I had stood on that bridge at midnight
And gazed on that wave and sky!


      *******

And forever and forever,
As long as the river flows,
As long as the heart has passions,
As long as life has woes;

The moon and its broken reflection
And its shadows shall appear,
As the symbol of love in heaven,
And its wavering image here.

      *******


Fell in love with this stamp when I first saw it. It reminded me of a fantastic, romantic park we visited a few years back.

The stamp is from Whimsy Stamps, DA1004, Bridge Over Water, from their Dove Art collection. After much consideration, I elected to use all Chameleon Color Tone alcohol inks which produces such a smooth and well blended finish.

Chameleon Color Tone: Warm Yellow, Taupe, Olive Green, Cool Gray 5, Neutral Gray 4, and Lagoon.

Well, that is it for today.

Till next time,

God Bless….


Per August 12th Spotlight notification :


Thursday, June 13, 2019


Graduation 2019…

Each year, young people the world over, celebrate the end of their high school experiences. They will be taking that first major step into their future – be it college, the military or joining the work force. Whatever their choice, we always wish them much success. Today’s card is for a special young lady. We only want the best for her future.


For the flower, I again used the fantastic Lady E Flower 004 die set. I used the White Foamiran and this time just cut 2 of each petal. With the school colors being Blue and Maize, I decided to accent the centers with Chameleon’s BL7 Idigo. 


The alcohol ink does not bled through the foam so I accented both sides of each petal. The color dries fast and does not rub off on your hands as much as a few other inks when you are rolling. I used my iron to heat each section and then did the folding and rolling process. (If you are not aware of this process, you may want to visit https://lizscreativecorner.blogspot.com/2017/08/my-latest-foamiran-frilly-roses-with.html. Liz Marsden has a great photo study.)

After using fingers and a ball stylus to open and form the crunched petal, I carefully hot glue the layers alternating the layers. To the smallest layer, carefully glue the 14 Craft Bar’s Mini Stamen “brush” into place. (Doing dimensional stamen is still a challenge for me but give me time, I’ll work it out!)

For the leaves, I again selected Lady E Leaves 003 dies and cut just 1 set. The paper is from USArtQuest’s Indian Batik Marble – Soft Green. This is a fantastic paper-cloth-like material. Natural veining. Using a ball-stylus and a stiff foam sculpting pad, form the veins to give height.


If you would refer to my June 8th article, Let’s Get Messy, you will see one of my messes on this card. (That was a fun process. Paint everywhere!)

The frame by Elizabeth Craft Designs, Rectangle Frame It-Stitched, was used to cut 1 piece from Stardream Papers’ Gold. That was mounted on the Messy blue, sort-of ocean background.

The rest is just assembly. I love layering so I used a dark blue paper layer to mount the flower, leaves and framed “artwork.” The base card is a soft white cardstock. Position pieces to your pleasure.

Hope this will offer some inspiration for one of your next creative adventures. I had a grand time with this card and am considering my next project.

Thank you for dropping by. Please feel free to visit anytime and offer any suggestions.   

Till later,
May God Bless You and Yours

Friday, August 3, 2018


(T+Y) x 3…


Thank you for dropping by today. Here in Michigan, we finally have had some long-awaited rain. Our desert brown lawn actually has a little green showing. But wouldn’t you know, just as the drought started, our push mower/trimmer died! So later today, it’s lawn-mower shopping!

We all know people who go out of their way to do the “behind the scenes” jobs. The three cards presented here today are for all the extra cleaning and TLC given by three wonderful ladies in our church. We recently had a new custom kitchen made to replace our old, well used kitchen in the church building. These three ladies gave up their day to polish and make the kitchen (and assembly hall) shine. Wish there was another way to express our thanks for all they continue to do for our Christian family.


Since I love to surf the net for something different in card-making products, I discovered Flonz Crafts, a family owned supplier in New Zealand!  They carry a lot of fantastic vintage stamps which captivated my imagination. The three stamps I used for this project are from their Vintage Flowers Engravings / Large Sheet 8"x 10"collection. They are just the perfect size for an A2 note card.


I stamped the image with a Gunmetal ink and heat set with a fine clear embossing powder. Next, I finished adding my color using the delightful Chameleon Pens. These pens were a joy to use, and the finished coloring was what I had imagined.

Hope this project will encourage you to look into different areas for exciting and diverse stamp designs. There is so much out there, just have fun.


Till next time –

May God Bless You and Yours


Friday, March 23, 2018


In Style…


Thank you for taking time to stop by today. Gee, this week has been a busy crafting week for me. I have to admit that I have really been having fun, especially with this card. It is for a young lady who loves to dressed-up. So, wanting to follow through with that idea, I decided to show a few stylishly dressed ladies…older styles and new.

Wish I could say who designed the two older styled stamps (I have had them for years) but the lady in the middle is from the Stampin’ Up’s the Beautiful You collection.

Using a Memento’s Gray Flannel ink, I stamped the images on Gina K’s Layering White card stock. To create more line emphasis, I heat set Ranger’s Fine Clear embossing powder.  To add the coloration, I used alcohol-based pens from Chameleon Pens: NUOO – Nude, YO3 – Warm Sunset, PK3 – Bubble Gun, and BG1 – Lagoon.  For the dresses, I infused the colors for a 2-3 second count – love how they blended.

I used Elisabeth Crafts’ Dashing Rectangle dies to cut the ladies and several layers of black cardstock. Wanting this project to have a little punch, I selected Elizabeth Crafts Time for Teal Soft Finish cardstock for the card base.

Again, thank you for stopping by today. I need to get back to my craft room as I have some new equipment scheduled to arrive in the next few days and I need to make more workable room.

Till later,

Have a Happy Easter and
May God Bless You and Yours


Tuesday, March 13, 2018


The Same but Different…


Those of you who know me, know how I love creating dimensional flowers. But I have to be honest with you. In the beginning, I did not think I would ever be able to create anything that looked even close to a flower. I watched and studied the videos and tried to determine what I would need to make it work with just one hand. After searching on line, I ordered a few dies from Susan’s Garden (from Sizzix and Elizabeth Crafts) and Heartfelt Creations. I struggled and tossed out probably my first 2 dozen attempts. I do not like feeling defeated.

This quest for creating was about the same time I discovered the advantages of the alcohol- based Chameleon Pens.  In their August 2016 Newsletter, they featured an article by flower designer, Susan Tierney Cockburn (Susan’s Garden). That article really impressed me beyond anything.  I cannot explain why but it did. My flowers were becoming my passion.

I am still excited to create flowers from quality papers. However, a year ago, I discover the art of 0.6mm foamiran. I fell in love with that little softer and more realistic creation. There are actually times the foamiran feels like a real petal. Like the paper, the foam accepts a variety of coloration mediums. The shaping process is a little different but the assembly is similar. 

For me, I have found that I need the various metal dies to create the petals. I tried to master hand cutting but I will not go there!  I now have a nice collection of name brand dies and unbranded dies. Because of my physical situation, it is easier for me to work with the medium to larger designed dies.

The flowers shown on the two cards in this article, were actually cut with the same larger 4pc die set. I used white and an ivory colored 0.6mm foamiran for each then blended sage on the one’s petals and teal on the other.

If you would like more instruction regarding the process, just leave a message and I’ll send you more detail.

Well, it is almost time for Easter, so I had better get going and creating!

Till later my friend,


May God Bless You and Yours.