Search This Blog

Sunday, August 25, 2019


Arteza Watercolor Pencils vs Chameleon Alcohol Pens
Applied to
Sift Finish Cardstock vs Watercolor (90 lb. cold press) Paper


First Test:
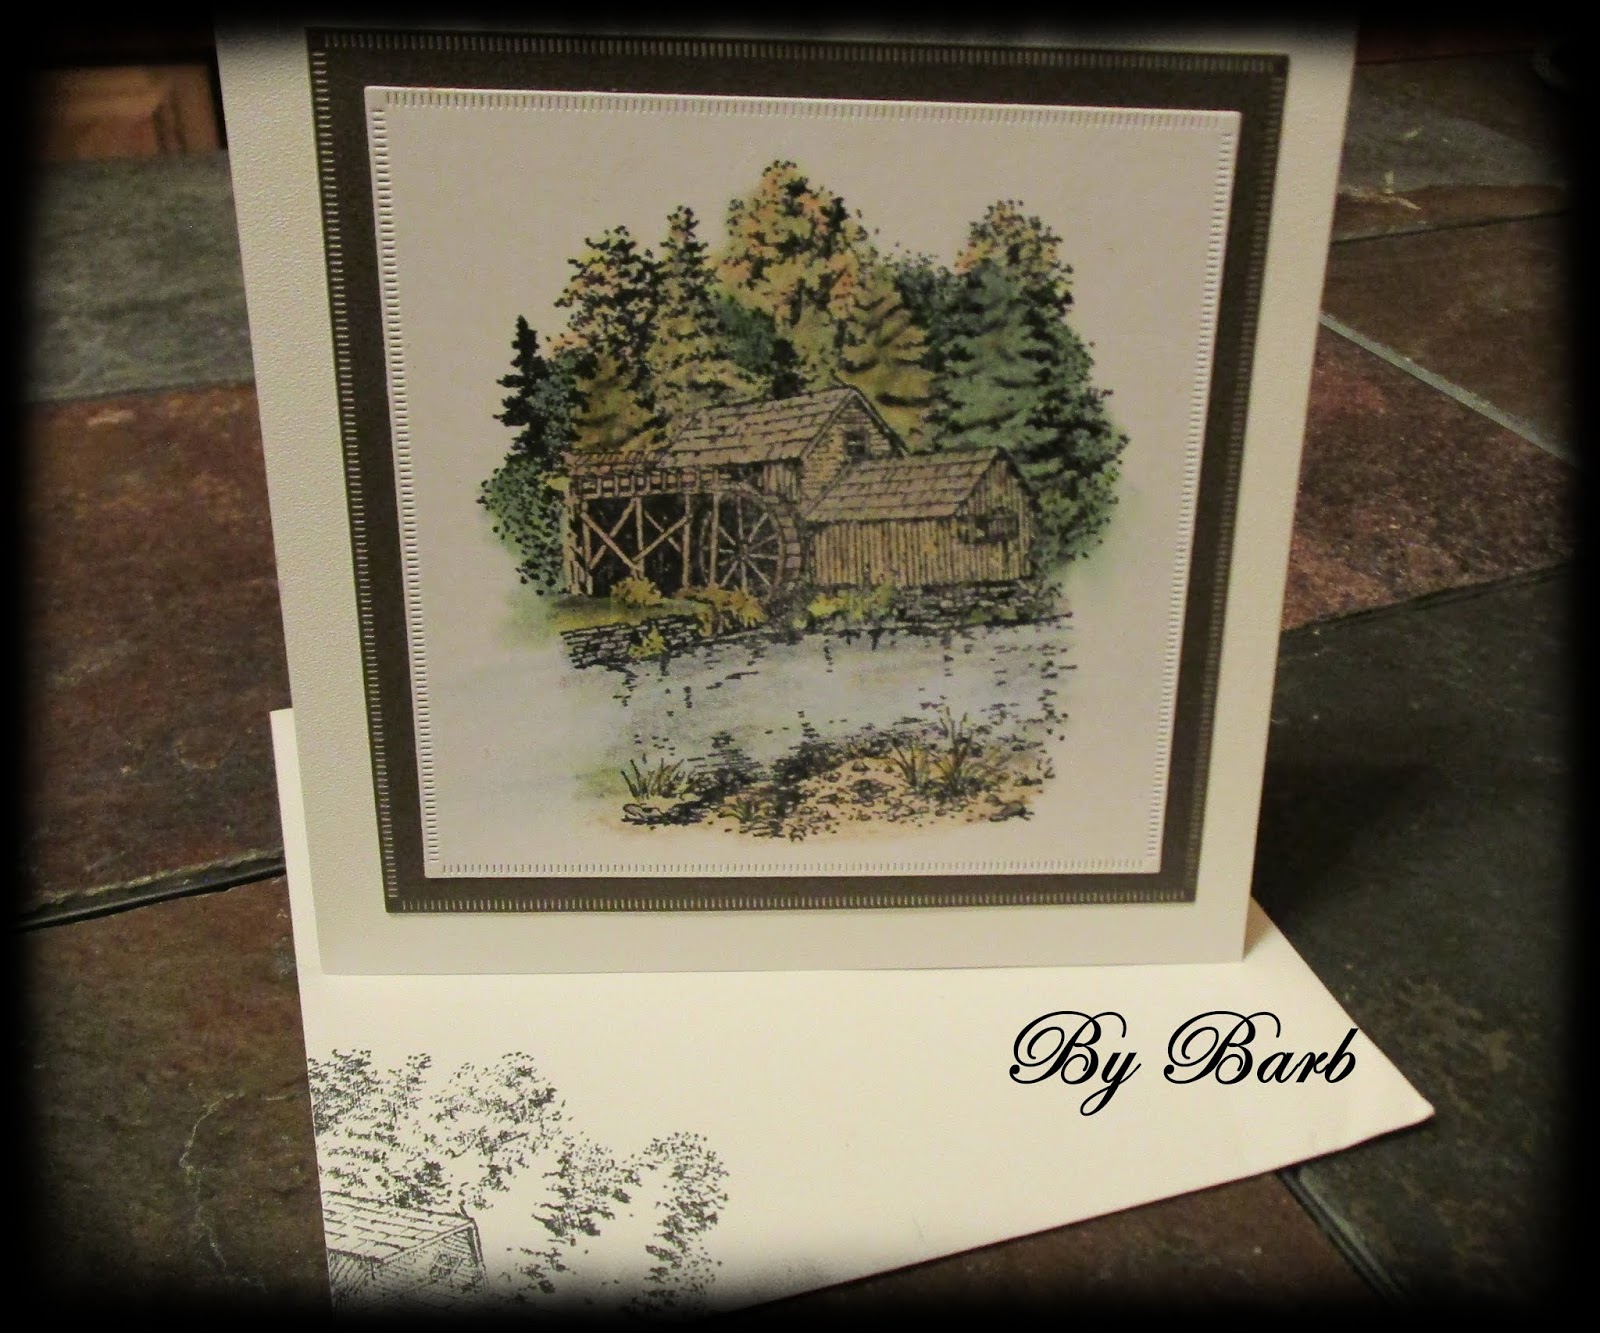
Elizabeth Craft Design – Soft Finish -White Cardstock
Whimsy Stamps – Dove Art – Himalayan poppy

Paper: My 1st goal was to see how the Soft Finish cardstock would hold up with all the water that would be applied.  I went over some of the portions of the design multiple times with the color and water. When wet, it did not warp. There are a few dimples on the backside but once mounted, they will not show. I’m impressed and recommend you give it a try.

Soft Finish using Arteza: Used a generic water-brush

A024 White Quartz
A052 Pumpkin
A070 Blueberry
A075 Ivory
A094 Emerald
A111 Coyote 

Arteza: This was my first time to use Watercolor Pencils in a very long time. For the last 10 years or more, I basically used my Prismacolor pencils (bought almost 13 years ago) and a blending nub in order to achieve the desired appearance. However, after watching Sandy Parker’s video and several other non-company artists, it was time to expand my creative directions.

I really must admit that I love my results. I could go on about the packaging, the pencil shapes, the clearness for the identifying names, but you have probably heard it all. As for performance, especially on this slightly textured surface, it was exciting. I applied a light pressure to the surface and was pleased with the water blending. I used a little more pressure on the wet area then blended again with the water-brush.


Soft Finish using Chameleon Alcohol Pens: 

Bl6 Royal Blue
OL3 Olive Green
YO3 Warm Sunset
CG8 Cool Gray

Chameleon Alcohol Pens: If you have followed my blog, you know that I totally enjoy us these alcohol pens. They work great wherever I apply them – every type, texture or thickness of paper plus great on Foamiran. Happily, there were no problems with this Soft Finish cardstock. 

I infused the Royal Blue to between a 5 and 10 count for the lighter areas and of course full strength for the darker. Like most of the papers I’ve tried, the alcohol does bleed through but with no textural distortion.

Second Text:
Canson – Watercolor Paper  (cold press) 90 lb. – Aquarelle
Gina K Stamps – Rose Bouquet
Arteza Watercolor Pencils vs Chameleon Alcohol Pens

Paper: My 2nd challenge was to see how the Canson Cold Press Watercolor Paper withstood the use of a WC pencils with a heavy water application and the alcohol ink. As I said earlier, it has been a long time since I enjoyed the benefits of watercolor.

If interested, there is an excellent article regarding the types of papers that I thought you might enjoy: https://watercoloraffair.com/cold-press-vs-hot-press-watercolor-paper-heres-how-to-choose/.

Cold Press using Arteza:  

A029 Moss
A052 Pumpkin
A064 Yellow Ochre
A100 Pear
A111 Coyote

Arteza: I wanted to use the same application technique as I did with the Soft Finish paper. I did a little extra water blending and occasionally blotted the surface when I felt it was getting too wet. I have used this paper weight with other types of watercolor but because of the WC pencil applications and extra water, the paper warped a little more than I wanted. I will try this again with a 140-300 lb. surface.

Because of the texture (unevenness) of the paper, the watercolor pencil has a softer, gentle appearance. Perfect for so many of our celebration cards.


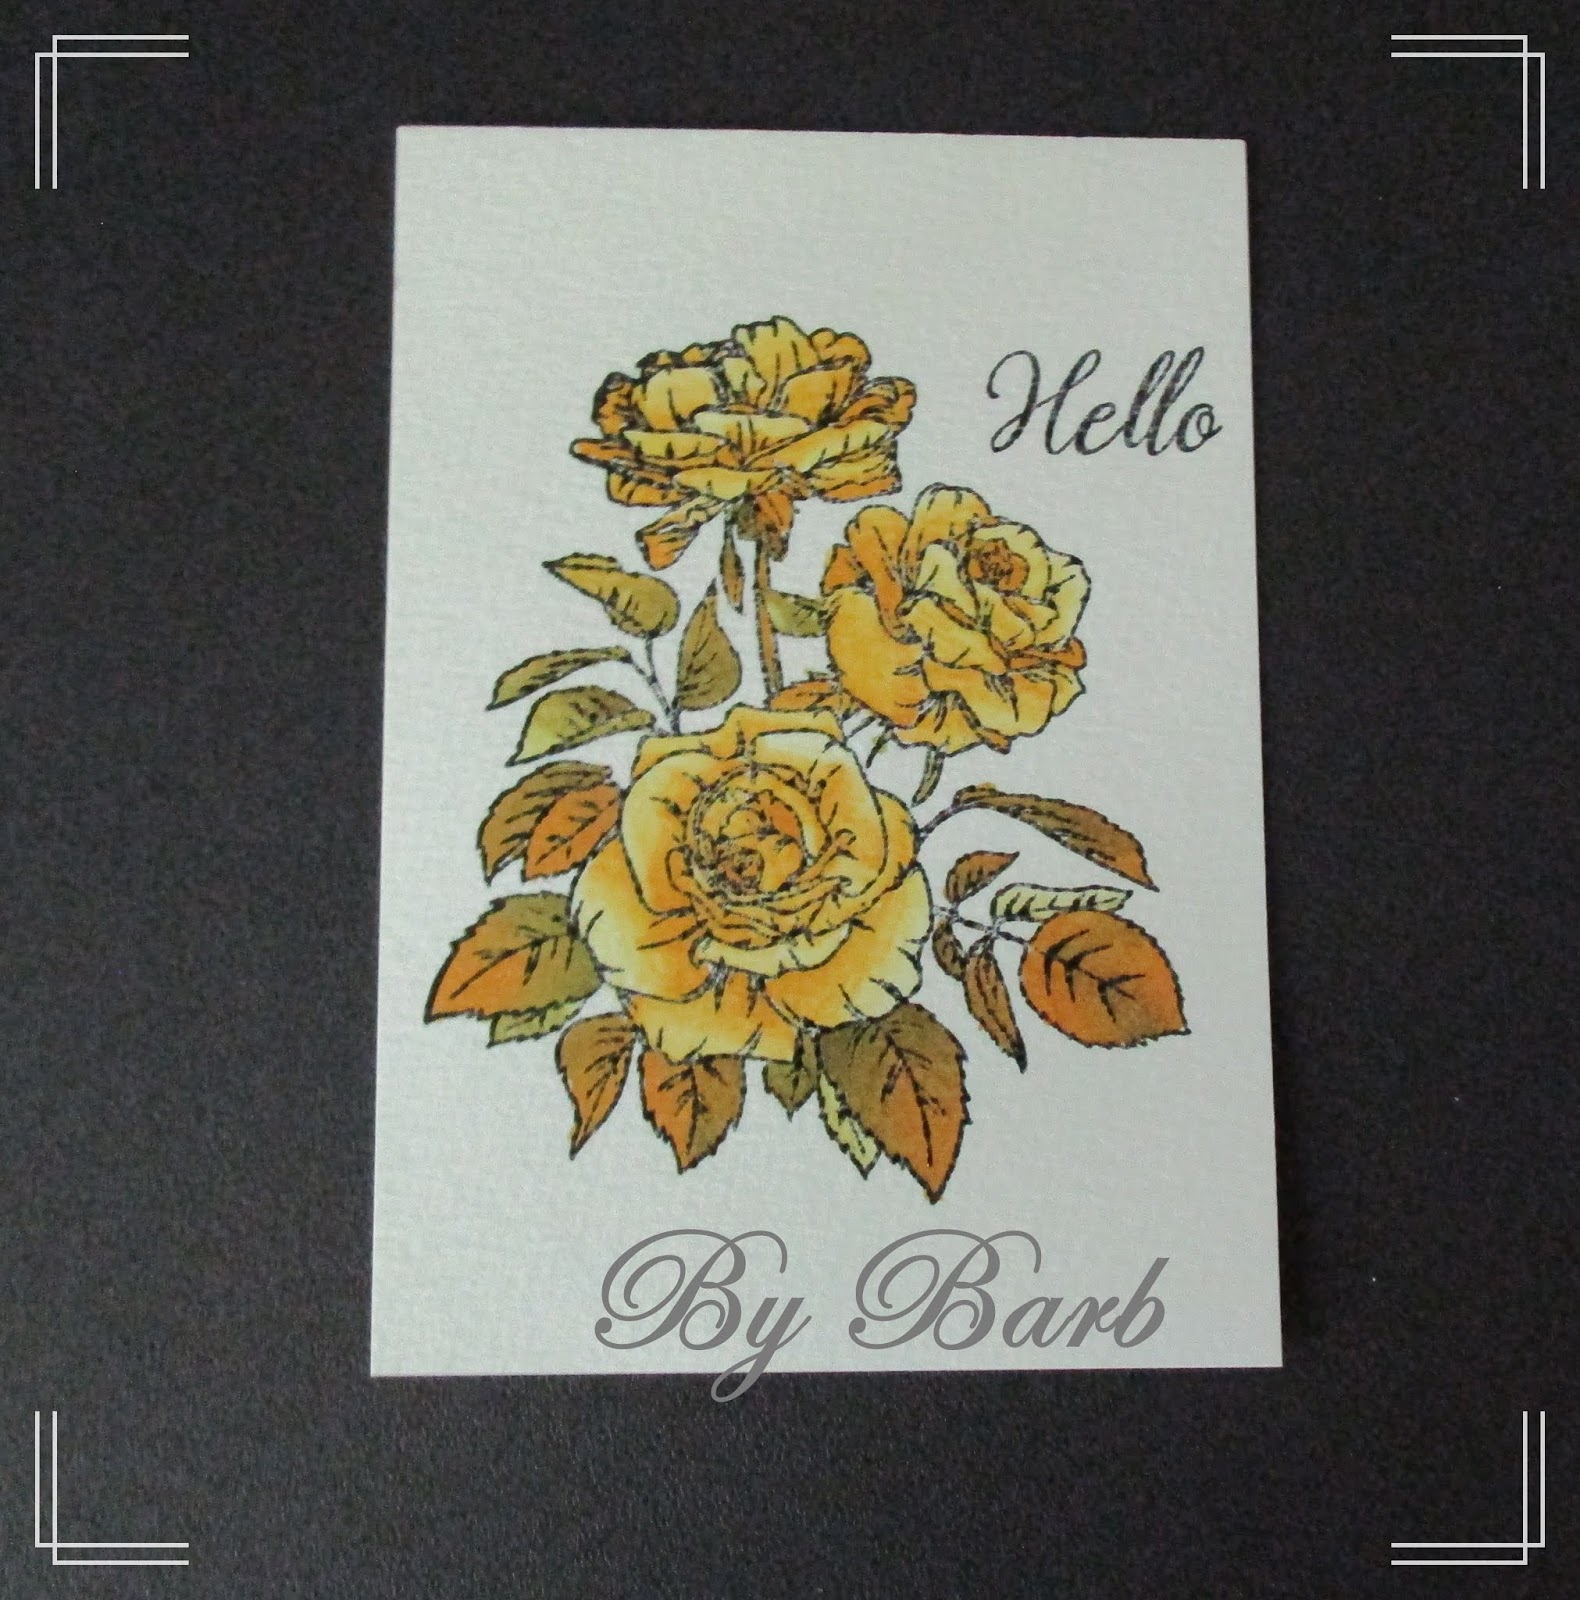
Cold Press using Chameleon Color Tones:
OL3 Olive Green
YO3 Warm Sunset
Chameleon Color Tops:
YO3 Warm Sunset

Chameleon: Again, I followed my same application technique. However, if you notice I only used two colors for the entire project. Using the infuser with the Warm Sunset  do a 5-8 count. Reapply full strength for the more intense Warm Sunset. The leaves were infused with the Warm Sunset onto the Olive Green. I’m really impressed with this appearance.

MY RESULTS: This was a fun project. I learned a great deal about both types of surfaces and the color applications. Do I have a favorite? I can’t really say. Love both.


Thank you for stopping by today. Hope this might help when thinking about the next card on your list. Now for me, it’s to complete the projects.

Till next time … God Bless Each of You.


Friday, August 16, 2019

Poppy Flower– 


Thank you for stopping by today. As you may know, during the past few weeks, I have been refreshing my card-craft supplies and have fallen in love the the Dove Art stamp collection through Whimsy Stamps.The stamp used for this article is called the Himalayan Poppy, DA1013. The Himalayan Poppy is, in reality, blue! (See descriptive notes at the end.)

However, having never seen the Himalayan, I went with the poppy colors I am more use to seeing, an off red/orange.

For this project, I used:
                                                                                                  
White Card Stock – from Staples (top layer and base card)
Middle layer – Neenah's Stardream Collection - Onyx 105lb.
Inked Impression: Memento Tuxedo Black – no embossing
Prismacolor Colored Pencils – start lightly applying the color, then, build up to a deeper intensity, then using a blender stick, blend:
·         Canary Yellow
·         Crimson Red
·         Goldenrod
·         Green Ochre
·         Marine Green
·         Raspberry
·         White


Hope you will give this a try - just relax and have some fun.

Till later,
God Bless


Special Note: 
The Himalayan Blue poppy flower, Meconopsis, is one of the most prized in the poppy flower family for its true blue colored blooms. This member of the poppy flower family is particularly sensitive to temperature changes and therefore can be difficult to grow. Found mostly in the Scottish highlands and Himalayas, they have been successfully grown in Alaska and coastal Washington. Their optimum temperature range is 50 to 60 degrees Fahrenheit.

Tuesday, August 13, 2019


The Old Water Mill…  


This summer has been a time of reorganization for my craft areas (that seems to be a continual chore) and expanding upon some of my creative goals. During my “reorganization,” I realized that I have a large collection of inks, paints and colored pencils that I have not used in a while. So, I set a new goal … utilize those products.

Recently, I started collecting some of the beautiful Dove Art stamps from Whimsy Stamps. (See my July 31st posting). The Water Mill (DA104) is one of my latest additions. Did you know that the use of Water Mills goes back long before the rise of Rome?

Materials –

Whimsy Stamps: The Water Mill (DA 104)
Elizabeth Craft Designs: Soft Finish: White and  Dark Chocolate
Dies: Dashing Squares
Chameleon Pencils:  Avocado and Spanish Olive
Rembrant Polycolor: Olive Green and Brown Ochre
Faber-Castell’s Pitt Pastel: 151 Helioblue-Reddish, 165 Juniper Green, 179 Bistre. 185 Naples Yellow, 273 Warm Grey IV
Prismcolor: Limepeel, Green Ochre, Cool Grey 90%, Orange Mineral, Blue Slate and Dark Green

Memento: Tuxedo Black
Krylon: Workable Fixatif (1306)
US Art Supply: Artist Blending Stump


Hope you will stop by again.
Till  next time – God Bless

Wednesday, July 31, 2019

Extracts from:


The Bridge


I stood on the bridge at midnight,
As the clocks were striking the hour,
And the moon rose o'er the city,
Behind the dark church-tower.

I saw her bright reflection
In the waters under me,
Like a golden goblet falling
And sinking into the sea.

How often, O, how often,
In the days that had gone by,
I had stood on that bridge at midnight
And gazed on that wave and sky!


      *******

And forever and forever,
As long as the river flows,
As long as the heart has passions,
As long as life has woes;

The moon and its broken reflection
And its shadows shall appear,
As the symbol of love in heaven,
And its wavering image here.

      *******


Fell in love with this stamp when I first saw it. It reminded me of a fantastic, romantic park we visited a few years back.

The stamp is from Whimsy Stamps, DA1004, Bridge Over Water, from their Dove Art collection. After much consideration, I elected to use all Chameleon Color Tone alcohol inks which produces such a smooth and well blended finish.

Chameleon Color Tone: Warm Yellow, Taupe, Olive Green, Cool Gray 5, Neutral Gray 4, and Lagoon.

Well, that is it for today.

Till next time,

God Bless….


Per August 12th Spotlight notification :


Tuesday, July 16, 2019


Acrylic Colors on Foamiran …


A few weeks ago, I noticed a question that asked what could be used to add color to a foamiran flower that would not rub off during the rolling (scrunching) process. That interested me so I decided to give it a go.

For this project, I again used Whimsy Stamps’ Lily Flower die to cut 1 layer of each size die from White Foamiran.

In the past, I have used Gelatos, various stamping inks, Chameleon Pens, pastels and a few different paste products. I was always happy with the results but of course, the color came off on my hands. Knowing that Acrylic Paints worked well on cloth, I was positive that there would be no problem on the foam.

For the pictured flower, I used Arteza Acrylic Colors A156 (Yellow Green) and A102 (Lemon Yellow). I double loaded a “comb” brush and pulled the color from the centers covering a little less than half of each petal. The colors blended well.

After using the iron to warm the foam, I did an accordion fold and rolled the pieces between my fingers. Then, using my ball stylus, I opened each petal and sculpted to my desired look. Then, as I expected, no color transfer on my hands.

Next, hot glue the layers, add some Micro Marbles for the stamen, and assemble to finish.

I have used many different brands of acrylics with the same wonderful results. You could also use watercolors and possibly oil paints. Just have fun and experiment. 


Thank you for dropping by. I had a great time getting this around and hope you will give it a go.

Till next time…God Bless You and Yours

Thursday, June 27, 2019


Just Because…


Thank you for popping in today. There is iced tea in the refrigerator, so help yourself and stay awhile

Today I am using Wimsey’s Hellebore Flower Die Set (the other name for this flower is Christmas Rose). Using White Foamiran, I cut 3 layers for each petal. When using Foamiran, a 0.6mm (0.02”) soft foam, you can safely cut up to 6 layers at a time. 

After cut my layers, using a dauber, I then applied Versa Color #161 Green Tea, to the centers of each and on both sides.

For the leaves, I selected Lady E Design Leaves 003 to cut one of each out of Apple Green Foamiran.

To do the shaping, may I suggest you view Sandy Parker’s, Crafting for Almost Everyone, June 11 & 16 shows: https://www.youtube.com/watch?v=OErPjZs4O88.

Well, it is time to get going. I’m playing around with some newer ideas and hope to soon present them to you.


Till next time,
May God continue to watch over you…

Sunday, June 23, 2019


For the Newbie Card-Makers…
Basic 101 Class


When you, our readers, first started making handmade cards, did you ever say, “I want to make my own greeting cards but I do not know where to begin.  I feel overwhelmed.”  That’s was me about 15 years ago.

In my earliest card-crafting days, I really was dumbfounded. I was a new amputee trying to see what I could do with just one arm. Can not tell you how many cards ended up in the waste can. (And some still do today!)

Anyway, after much thought, I decided to do a photo study, designed to mostly assist the “newbies” in our audience. The stamps used here are among my very first, and favorites. These offer you the freedom to create your own designs and/or backgrounds. The stamps are from Rubber Stamp Tapestry (pegstamps.com). They carry a fantastic variety of themes. When you have a moment, check them out.

For the most part, it is best to use a good 8.5” x 11” cardstock for your base card. It is firmer than computer paper or craft paper, offering a better and stronger quality to your card. Cardstock comes in hundreds of colors and textures. May I suggest you start with just a bright white.

Most handmade cards measure 4.25”x 5.5”. Below you will see two different ways to achieve the standard sized cards.


This is a short material list –
·        stamp set (Cherry Blossom has just 4 stamps)
·        ink colors of choice (I suggest at least 5
·        Stencil (heart in this case)
·        Blender brush (dauber or sponge)
·        Post-It strips
·        Scratch paper for under the card 


My work space will be different than yours as I use a magnetic field to help hold my work in place.


What follows is a photo tutorial showing the process to make what is called C.A.S. (Clean and Simple card). This one was cut on the 8.5” side. Then, folding in half lengthwise.


(Exchanged  #55 Umber instead of #69 Bamboo)


When you are satisfied with the over-all results,  
you may want to add an envelope.                                                                                                                              Hope you enjoyed this class. Till next time...

May God Bless You, Always.


Thursday, June 20, 2019


Sunflower …

How radiant.  A lovely sight
Glowing in the bold sunlight.
Love, peacefulness and mirth—
Giving joy upon the earth.
Sunflower.  Unique you are.
Your beauty radiates afar—
Engaging the human race, 
As always, with a happy face.
Lovely is the song you sing,
Its heartfelt melody to ring. 
A song of beauty and of grace
Lends expression to the face. 

How charming is the sunflow'r
Adding zing to flow’r power.
                   walterrean salley 2015


A dear friend of ours has been under the weather lately. She is not one to be “down” and usually is the one who brightens everyone’s day. Thought she might like a little something different to help cheer her.


The Card – Clean and Simple:
I recently ordered the Creative Expressions’ new Papercuts Craft Dies’ 5 new edge die collection. Sunflower Edge caught my eye. I had been thinking about making a sample and picked up a piece of Stardream’s Emerald 81T. That paper changes its appearance from dark emerald to black according to the surrounding lighting.  I loved the beauty of that cut and just set it down on a piece of soft yellow/orange mottled paper. (Wish I could remember where I picked up that piece but the old brain is not cooperating today.) I liked the results. 

Anyway, as I looked the combination, I thought of our friend. Now I hope it makes her smile. 

Till another time –

May God Bless You…Always

Monday, June 17, 2019


It’s Show Time…

Sorry, no project today. Guess I’m just so excited that Sandy Parker has released our tapings regarding Foamiran Flowers. She did so on her YouTube show Crafting for Almost Everyone. Please take a few minutes, relax and enjoy your favorite drink while you watch:


Thank you for watching and let both of us know what you think.

Till later,
May God Bless you and Yours

Thursday, June 13, 2019


Graduation 2019…

Each year, young people the world over, celebrate the end of their high school experiences. They will be taking that first major step into their future – be it college, the military or joining the work force. Whatever their choice, we always wish them much success. Today’s card is for a special young lady. We only want the best for her future.


For the flower, I again used the fantastic Lady E Flower 004 die set. I used the White Foamiran and this time just cut 2 of each petal. With the school colors being Blue and Maize, I decided to accent the centers with Chameleon’s BL7 Idigo. 


The alcohol ink does not bled through the foam so I accented both sides of each petal. The color dries fast and does not rub off on your hands as much as a few other inks when you are rolling. I used my iron to heat each section and then did the folding and rolling process. (If you are not aware of this process, you may want to visit https://lizscreativecorner.blogspot.com/2017/08/my-latest-foamiran-frilly-roses-with.html. Liz Marsden has a great photo study.)

After using fingers and a ball stylus to open and form the crunched petal, I carefully hot glue the layers alternating the layers. To the smallest layer, carefully glue the 14 Craft Bar’s Mini Stamen “brush” into place. (Doing dimensional stamen is still a challenge for me but give me time, I’ll work it out!)

For the leaves, I again selected Lady E Leaves 003 dies and cut just 1 set. The paper is from USArtQuest’s Indian Batik Marble – Soft Green. This is a fantastic paper-cloth-like material. Natural veining. Using a ball-stylus and a stiff foam sculpting pad, form the veins to give height.


If you would refer to my June 8th article, Let’s Get Messy, you will see one of my messes on this card. (That was a fun process. Paint everywhere!)

The frame by Elizabeth Craft Designs, Rectangle Frame It-Stitched, was used to cut 1 piece from Stardream Papers’ Gold. That was mounted on the Messy blue, sort-of ocean background.

The rest is just assembly. I love layering so I used a dark blue paper layer to mount the flower, leaves and framed “artwork.” The base card is a soft white cardstock. Position pieces to your pleasure.

Hope this will offer some inspiration for one of your next creative adventures. I had a grand time with this card and am considering my next project.

Thank you for dropping by. Please feel free to visit anytime and offer any suggestions.   

Till later,
May God Bless You and Yours