Search This Blog

Saturday, June 23, 2018


Thank You Hospice…

As some of you know, my mother has been under the care of Hospice of the Valley, in Arizona. On Sunday, June 10th, she very gently left us. She was 93 years young.  

Ever since Mother’s Day, Hospice personnel were attending to her personal and health needs. They called both her daughter-in-law and me with information regarding her daily situations and declining health. They also told us how we, although 2000 miles away, could assist. The compassion was evident with each call. Even after her passing, members of the Hospice team have called to see how they could help the families during this grieving period.

My sincerest gratitude and deepest respect for these remarkable men and women, our Earthly Angels.

These two cards were the hardest Thank You Cards for me to make. I wish I could do more.


God Bless All of You


For more information regarding Hospice: 
https://www.nhpco.org/about/hospice-care

Friday, June 8, 2018


Just Having Fun...

Thanks for dropping by today. Hope all is well with you and your families.  

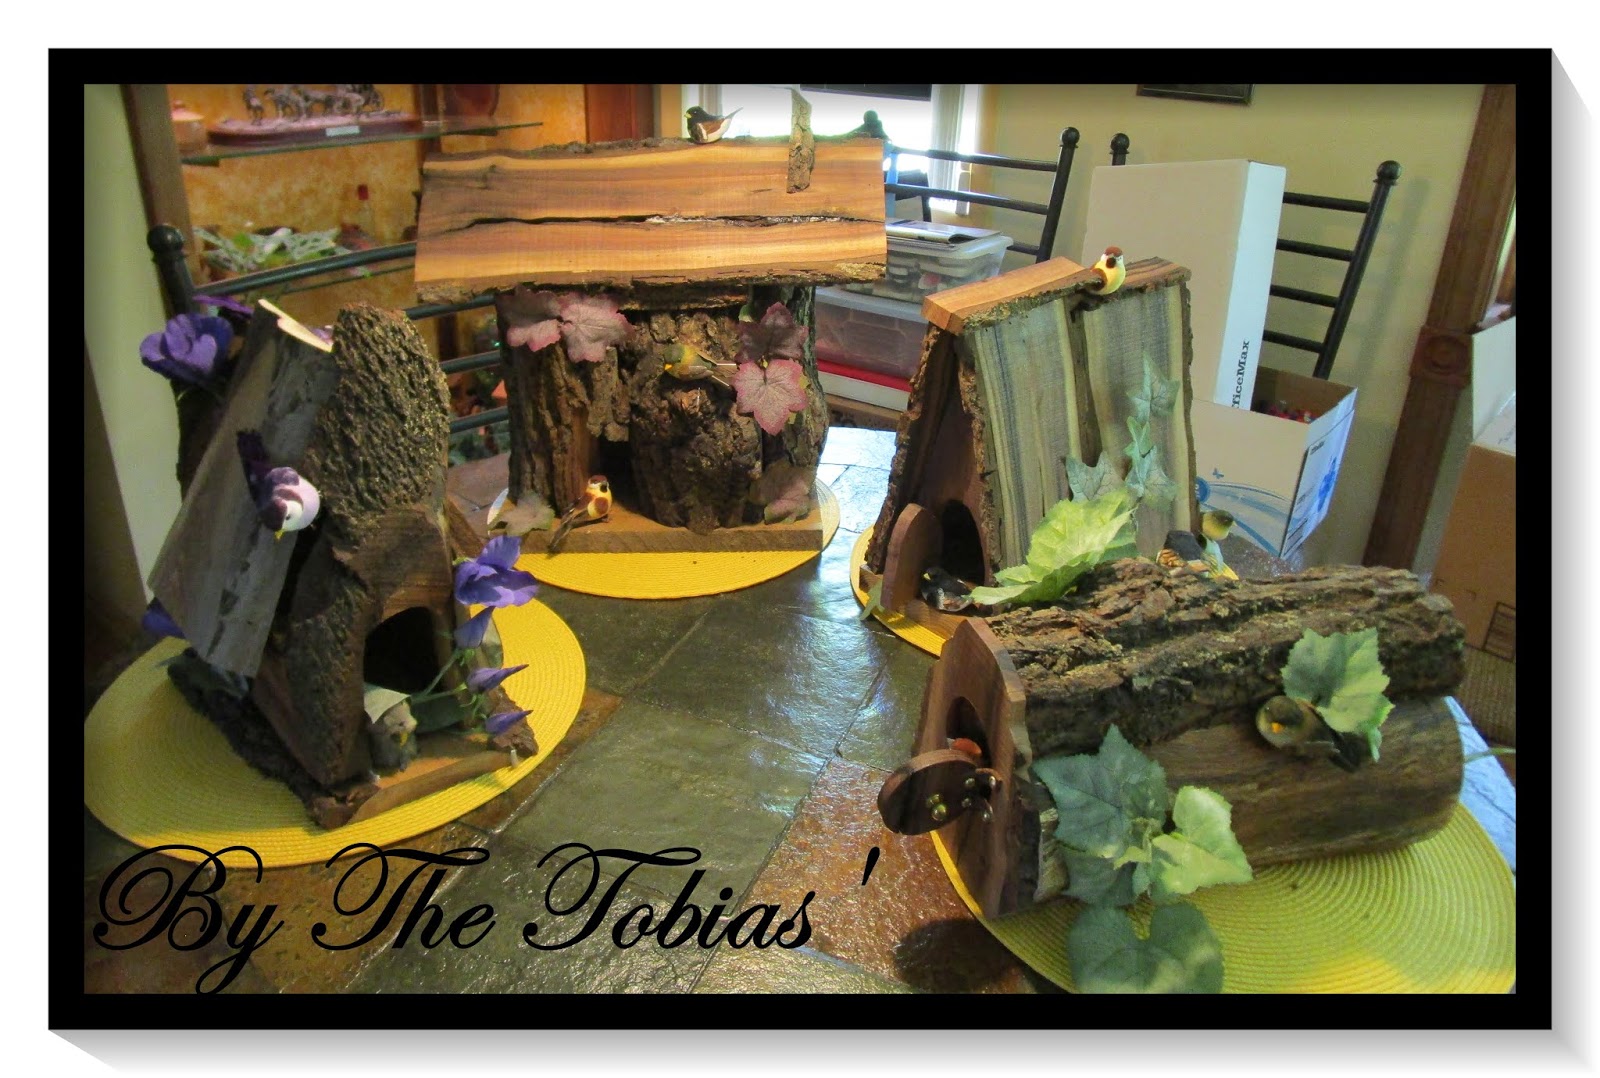
With Father's Day two weeks away, we decided to create something different for our church’s June Pot Luck. As you may know, Jim has retired to become a woodworker. When I suggested bird houses for centerpieces, he replied “Rustic?”


Well, rustic it is – logs and building remnants. He was like a young kid creating these masterpieces! I must say, I love all of them.

My part was adding the birds, (a mouse?), flowers and leaves. Actually, I think I wore more hot glue than I got on the pieces.

Can’t wait to set up this month. Hope everyone gets as much fun out of these creations as we had doing them


Till next time,

May God Bless You Always

  •  


Tuesday, June 5, 2018

A Successful Marriage…

“A successful marriage requires falling in love many times, always with the same person.” 
~ Mignon McLaughlin


I love that quote. It describes what happens when we truly love our spouse. Friends of ours continue to be an example of A Successful Marriage. They are celebrating 64 years together, as husband and wife. Just seeing them together, warms our hearts. Their love is radiant.

To acknowledge their special event, I wanted to create a card that, in my mind, reflects their devotion towards each other, their gentleness. Thus, the rose.

The Flowers and Leaves:
For the flower cut 5 layers of each petal from Whimsy’s Stamp’s Rose Petal out of White Foamiran. To create a blush of color, randomly blended Faber-Castell’s Cotton Candy Gelato to both sides of each petal. After lightly heating each piece, then crinkled and shaped each piece. Using the smaller Flower Bud drop shape, wrap and hot glued the 5 of smaller petals to form the rose center. Then carefully glued the remaining petals to form the size rose I wished.

For the leaves, cut 3 layers of Evergreen Foamiran with Sizzix #66111 Leaves and Spring die. Next accent the edges by blending with Faber-Castell’s Chocolate Gelato. Now, like the flower petals, lightly heat each leaf, then crinkled and shaped them.

The Layers:
Using Silver pearlescent paper, die cut with Our Daily Bread Design’s Vintage Flourish Pattern die. Layer that on top of Powder Blue pearlescent paper. The base card is again the Powder Blue.

Thank you so much for dropping in today. June is really bursting out on my calendar and there are several wedding/anniversaries events coming up plus graduations. Guess my craft rooms will be busy.


Till next time,

May God Watch Over You


Friday, June 1, 2018


Stargazer, My First Attempt…


This is Lily Season. One of the most popular lilies in our family seems to be the Stargazer. I actually have made many different lilies before but never with this particular beauty in mind. I have to admit, stamen just plain intimidate me. Therefore, in the past, I used Prills for my centers. However, this Thank You note is for a special couple who deserve a more realistic interpretation of this delicate flower. Really hope I am close.


Materials:
  • ·       White Foamiran and Green Foamiran
  • ·       Whimsy Stamp’s - Lily (die)
  • ·       Gina K’s - Lipstick
  • ·       Chameleon Pen’ - Warm Gray
  • ·       Felt tipped Stamen
  • ·       Our Daily Bread Design’s - Majestic Medallion die
  • ·       Gemini die cutting machine
  • ·       White and Pink pearlescent papers
  • ·       Daubers
  • ·       Hot Glue    
  •      1/8” adhesive tapetoday


     For more instruction, just leave a message and I’d gladly respond.

Till later,
May God Bless You

Friday, May 25, 2018


Card Fun …


 With the onset of warmer weather here in Michigan, our furnaces have been turned off and our windows are open! Really has been refreshing to hear the songs sung by those early morning birds and feel those afternoon soft breezes. Fresh air at night as we slept has been delightful. Newest Forecast: Rain and high temperatures…about time for the air conditioners. So much for all that fresh air!


I’ve been busy this week but thought I would share a few photos of my most recent cards. While attending the Great Lakes Mega Meet earlier this month, I picked up a few new flower and background dies from Gina K, the Purple Daisy, and Elizabeth Crafts. Our card/scrapbook hobby field is really busting with an unbelievable amount of new ideas and products. It really is an exciting time for paper crafters.

Sorry for not including better detail this time but seasoned crafters can see what is used. For those of you who are newer to the craft, if you have questions, just comment below and I send you the info.


Till next time,

God Bless You and Yours


Monday, May 21, 2018


Easy and exciting wreaths…

One of the newest and hottest items in today’s card making community is probably the simplest thing on the market. And appreciatively, we have Gina K to thank for bring her “Wreath Builder” stencils to our attention.

I have found that making wreath designs was always fun but having a balanced design was not as easy as it looked – never got that technique perfected till now.

While attending the Mega Meet in Novi, MI. we had the chance to watch Gina in person as she demonstrated her Wreath Builders. I already had mine but was fascinated with her presentation. Such a pleasant and talented lady. She really captivated the audience.

I’ve created several cards using the stamps with Gina K’s Wreath Builders Kit and several using stamps from Altenew’s Beautiful Day (two of the smaller stems). I even had fun with a few unbranded leaf stamps. 

The cards pictured in this article are only a few of my finished cards (mailed the others before getting the photos). 


If you have not tried Wreath Building, I hope you will soon. The possibilities are only limited by your imagination.

I have some Anniversary cards to make this week and might use this idea as the back ground with one of my foam flowers in the center…hum!

Thank you for stopping by today. I love sharing my cards with you.What are some of your upcoming project? Want to share your creations?

Till later,

May God Bless You and Yours

Special Note: Do you like country music? If so, you may want to watch for Josh Molletti. He has a YoutTube site and can be seen on Facebook. 

https://www.youtube.com/watch?v=UAwiqvwBpZY&feature=share
And  
https://www.youtube.com/watch?v=eAg7iE9U4PQ (he wrote this song for his two beautiful children)


Monday, May 7, 2018


F.Y.I. – A Do-It-Yourself 

Magnetic Work-Station

Many of you are acquainted with the newer stamp positioning tools. While considering my continuous problem with papers moving while coloring and painting, the thought of using magnetic surfaces became apparent. I just did not want to work in those surfaces and accidentally mess them up. 

Solution: Amazon.com carries an 8”x10” Adhesive Backed 60 mil Ultra Thick Magnet Sheets. There are 5 sheets per pack. The cost is under $20. Once they arrived we went to our local Alro Metal Outlet and obtained enough 8” wide 1/8” thick EDP plastic to make all 5 magnetic work surfaces. Just peel the backing off the magnetic sheet and place on the plastic. For under a total of $30, I now have 5, light weight usable surfaces. Now just use your rare-earth magnets and you are ready to create.


Hint: in your work area, if you are working on a wood surface, you may want to have something like a grip, non-adhesive, shelf liner under the plastic to protect both surfaces.


Thursday, May 3, 2018


Mother’s Day 2018…


Thank you for logging on today. This card is for my 93-year-old mother. As some of you know, she has Alzheimer’s. Recently, she has started receiving Hospice Care support.
*****************
About a year ago, I discovered the beautiful flower making art of creating handmade flowers using 0.6mm (about 0.02”) Foamiran. At first, we had to order our foam from outside the US (I was ordering from Ireland). We now have a few US businesses that carry all the colors.

Because of my disability, it is easier for me to use the electric Gemini embosser and die cutter. For this card, I used Heartfelt Creations’, Sweet Peony to cut White Foamiran from Whimsy Stamps. One of the most exciting features of using foam is that you can cut as many as 6 layers of foam at one time! Love it!

To give a little color, I randomly blended Gina K’s Prickly Pear into the centers and petals on both sides.

For the flower’s assembly, I would like to refer you to one of the best photo studies I have seen. Liz Marsden is well-known for her cardmaking and realistic flower talents. I have been a follower of her blog for almost year and have gleaned many helpful hints from her. Please, take the time to visit her BlogSpot and take a lesson from one of the very best:

Have you noticed the “window?” Well, that was cut from an unbranded, multiple piece die. I only used 2 dies from the center of this 7-piece set. 

The “You mean the world to me” stamp is from Gina K’s, Rose Bouquet. The rectangular tag was cut from Elizabeth Craft Designs, Stitched Rectangles #1120.

Till next time,

May God Bless You & Yours

Friday, April 27, 2018


My “Cabbage” Flower Garden…

 Each month, Jim and I have elected to decorate the tables for our monthly church pot luck. Coming up with ideas is both exciting and sometimes challenging. Some months are easy and simply done. Others, well we really do need pull our imagines together. (Wait till I show you the June project…)

For our May gathering, I wanted something way out of my usual silk flower arrangements (May is always a Mother’s Day theme). Several weeks ago, I noticed David Tutera’s Big Flower demonstration on YT and was fascinated by the flower sizes (8.5” to 12” across).  If you take a look at my April 13th article, you will see my first Big Rose Flower.  


Well, last week my last three dies arrived. Since then, I have been rather busy. If you look at the videos, you will notice how smooth and elegant the flowers look. Since I really wanted to use a variety of the Indian Batik papers from USArtQuest, I just knew smooth was going to be out of the question. So, being me, I decided to crinkle those lovely large petals.  If you have ever crumpled a piece of paper to throw away, then you have mastered my strange technique for these flowers. I used hot glue to secure the petal layers. Let me warn you to use caution as to not burn fingers. (Experience speaking here!)

When I finished and covered my table with large flowers, Jim was ever so kind as to call them “Cabbage Flowers”!

This was really fun! If you want something exciting for those upcoming summer-time gatherings, you may want to give these oversized flowers a go.

Now that we finally have spring like temperatures, I think I will close for now and go outside!


May God Bless You and Yours


Wednesday, April 18, 2018


That Lacquerware Look…

Thank you for stopping by today.  For the first morning in more than a week, there was no new snow on the ground. There might be hope for a real Michigan spring yet.

Currently, I’m in need of a few Thank You and Thinking of You cards. Had sort of a direction in mind until I watched a Gina K Designs video entitled “Lacquerware Inspired” (https://www.youtube.com/watch?v=-WzF7RorNTg) and that changed my mind. I really love Gina’s videos. I’ve learned a great deal from that talented lady. If you have not discovered her yet, please look her up.

If you watched the video, you can see what products I used with the exception of using this beautiful cherry blossom from Stampin’ Up’s retired Indescribable Gift collection.

If you try this oriental lacquer look, let our followers see your work.

Till next time,
May God Bless