Search This Blog

Sunday, June 23, 2024

 Elegant Writers

Have you tried them yet? So much fun with some exciting effects. Just add water and - wow!

I may have shown these card fronts on aNNie's World Wide site but I finally finished mounting those pieces. After pulling out the backgrounds using a flat brush and water, I filled in the slimline card using watercolors and PanPastels (total play-time!) The other card was finished with just the exciting pastels.  


I do not have patterns of those two but I am adding a pattern you may want to try. 


Well, I think I need to get back to stamping some some cards. Trying to come up with Christmas ideas and maybe a few for the fall season. Hummmm

Till next time,

May God Bless You and Yours.

Thursday, June 20, 2024

Elementary! Elementary, My Dear!

Blue + Yellow = Green 

Yes, that color combination really is elementary to every beginner art student and serious artist! Once we fall in love with combining color with color, there is no stopping the romance. 

Materials for this card: Stratmore 140lb/300g/m Watercolor paper, Blick Studio Acrylic- Phthalo Blue, Arteza - Mid Yellow, and W. A. Portman 1/4 flat.

Today, I would like to challenge you to a color experiment. You can use my simple hand-drawn pattern or one of your own, to mix any two colors using acrylics, watercolor, crayon or pastels, to create a card front. When completed, please post your challenge piece - let everyone see your results - just list the colors you used. (Wish I could offer a reward for taking this challenge, but let your card be your self-reward).


Monday, June 17, 2024

Freehand Brush-stroke Practice with Watercolors


Many years ago, I taught several classes doing what I classified as "Fantasy Painting." I still refer to this style as Fantasy but in reality, it is basically simply using your favorite brush strokes by loading two or three colors on that brush. I also suggested that the students practice each type of stroke with different shaped brushes of different sizes. Then paint.

One day, one of my extremely talented students asked why her pieces did not look as good as my class sample. I remember trying to suppress a giggle when I answer, "you should see my waste can!" 

Today's watercolor practice piece says the I need more practice. With this type of technique, I do not sketch it out first - just relax my arm, put on some relaxing music and let the brush "talk" to me. For this piece, there are mistakes, flaws, and puddles that should not have been - but this was just a practice piece. I'll probably do one or two more using these colors before I feel comfortable enough to publish.

So, here is my flawed PRACTICE FANTASY BRUSH STROKE STUDY: 


ADDED PROJECTS:

Years ago, my husband asked that I design two of our large ceramic vases with my brush-stroke Fantasies. These were kiln-fired.


Thank you for stopping by today and letting me ramble on.
These vases were my passion and now trying to reduce my surface size, 
for greeting cards that has been a wonderful challenge. 

Please stop by again
and 
May God Bless Ya'll.


Friday, June 14, 2024

Autumn Leaves - Fantasy Line and Color


It has been a very long time since I've blogged! Like so many of our friends, our lives just got way too busy. For that, I apologize. I just realized how much miss sharing with you.

If you are visiting here for the first time, please note that I am just a card crafter, just like you. I do not consider myself a professional, just an old "want-to-be" artist.

During the past few years, I've continued creating and experimenting with new ideas and revisited some of my almost forgotten techniques. Watched so many videos that I was starting to get confused (ok, so I'm pushing the 80 year old mark and that may explain some of it!). 

When I finished the project I'm showing today, I thought it might be fun to share the step-by-step process. Years ago, when I did my Fantasy designs, I used  acrylic paints and would double and triple load my brushes. Recently, my husband asked me to try sketching out the design and use alcohol inks (pens) to blend. It was different but so much fun. 

Well - here we go - the material will be listed at the end. Fell free to borrow my sketch and let me know what you come up with. 


Materials:     

Sketch pencils

Tombow-Mono Zero Eraser

Susan’s Garden Specialty Cardstock – 8-lb.

Lavinia Stencil – Leaf Trails

PanPastel – Hansa Yellow Tint

Solve Make-up blush brush     

Gardeners Green Pea – 10lb Christmas cardstock

OLO ALCOHOL PENS (MARKERS):

·        O2.5   CARMEL

·        OR1.3   PAPAYA

·        OR4.7   CHOCOLATE

·        R0.6    CRANBERRY

·        R1.8    MAROON

·        R5.7    AMARANTH

·        Y8.6    FENNEL SEED

·        YG2.5   AVOCADO

·        YG8.5   MOSS

·        YG8.7   FERN

·        YO2.5   YELLOW OCHRE 

Well, that is it for today. 

Till next time - May God Bless You!


Friday, September 11, 2020


    To all our creative crafters and cardmaking friends everywhere…welcome to my blog. Sorry for this long, six-month absence.

     I do want you to know that today’s installment is just some of my thoughts – not a creative project. Here in the US, it seems our crafters have had to start online shopping more than ever. Our trade shows are gone for this year (at least here in Michigan) and the craft stores, after they reopened, are still limited in many areas. I’ve been looking for certain crafter type acrylic paints and discovering that most of my desired colors are totally unavailable (some total lines not even on the shelves). And what I found on line, was not what I needed. But that is okay and I’m trying to adjust to that one. That project is still on hold. I’m hoping the companies are working and will be shipping out soon.

     I do want to praise our online hobby and craft suppliers for their efforts to keep us supplied. That kept the postal service busy! And UPS trucks have a well-worn tire track to our door.

     Now for what is really concerning me. I wish I had a way to help those with similar situations.

     This morning, I received a letter that brought tears to my eyes. A young woman with multiple handicaps and wheelchair bound, was reaching out. Her cardmaking friend/companion passed away several months ago and she sounded like there was no one available to help her with her desire to create. She sounded frustrated.

     I was wondering if anyone knows of groups that would offer this type of assistance to individuals. Are there such groups that could be friendly helpers?

     As you may know, I too am handicapped but I am lucky- I’m mostly independent and capable of doing for myself. I cannot imagine being in this lady’s situation. Nor can I imagine not being able to get my creative abilities active.

     If you or your friends have suggestions, please contact me so we can tell others.

     Thank you for reading my thoughts.

 May God continue to bless you and yours.

Tuesday, March 31, 2020


Times have changed…

I know these are trying times for all of us. Our world, not just our own country, is now in “lock-down.”  Never even imagined something like this could happen.

I have been debating what to do for the next month or so. I’ve spent so much time crafting and playing with newer products for so long, well, now I think I owe it to myself and my husband to get our home put back in order. So, this will be my last blog for the time being.

Before I close down, thought I would share this poem by Donna Ashworth.

History will remember when the world stopped 
And the flights stayed on the ground 
And the cars parked on the street
And the trains didn’t run.

History will remember when the schools closed
And the children stayed indoors  
And the medical staff walked towards the fire
And they did not run.

History will remember when the people sang
On their balconies, in isolation   
But so much together
In courage and song.

History will remember when the people fought
For their old and weak 
Protected the vulnerable          
By doing nothing at all.

History will remember when the virus left
And the houses opened 
And the people came out 
And hugged and kissed    
And started again

Kinder than before.

Thank you for all your support during this world situation.
Please stay safe.
God Bless You and Yours

Saturday, March 7, 2020


Envelopes, Card Layouts and Boxed Mailers…


Hello, and thank you for dropping in today. We are doing something a little different and would like to refer you to my March 6th video on face-book’s Let’s make Cards Group. This is being geared towards our new card crafters but just might aid some of our more seasoned creators.


PACKING DIMENTIONAL FLOWER CARDS

Please note: I order in quantity which saves money in the long run. There are many bulk paper and business suppliers but I prefer using the following for my “mailing supplies".


Clear Box with Gold Insert:
6-3/8 X 5-3/8 X 1-1/2 1/2# PVC SETUP BX W/GLD CARD
5.1 LBS / case
840965
50/CASE


White Outer Mailing Box:
7 X 6-1/2 X 1-7/8 (I) WHITE TUCK TOP BOX
11.6 LBS / bundle
073427
50/BUNDLE


LAYERED CARD FRONTS FOR DIFFERENT SIZED ENVELOPES

These are just my suggested, personal guidelines – could be altered to your use. I show  a ¼” reduction per layer. Some will go to 1/2” reduction. Just have fun –remember to make the layers your design.

For 6.5” square envelope – use 12”x12” cardstock cut to 6”x12” – fold to 6” Square
          Squared Layers:    5 ¾”
                                       5 1/2”
                                      5 ¼”
                                      5”        


For 4 ¾” x 6 ½” envelope –use 8 ½” x 11” cardstock, cut to 9”x 6 ¼” - then fold to 4 ½” x 6 ¼”
          Layers:        4 ¼” v 6”
                             4” x 5 ¾”
                             3 ¾” x 5 ½”
                             3 ½” x 5 ¼”          


For 4 3/8”x5 ¾” envelope –use 8 ½” x 11” cardstock, cut 4 ½” x  5 ½” - then fold to 4 ¼” x 5 ½”
          Layers:        4” x 5 ¼”
                             3 ¾” x 5”
                             3 ½” x 4 ¾”
                             3 ¼” x 4 ½”          

I think this will give you the idea.
·        Measure your envelope.
·        Use cardstock for the base card. Cut so as the finished base card is at least ¼” smaller than envelope front.
·       Layers should be at least ¼” smaller than base.
·        Each additional layer should be at least another ¼” smaller than previous layer.

For me, being consistent with my reductions has helped the overall appearance. Each of us has our own ideas and preferences for making our “celebration” cards. 

Play with your ideas. Check out other sources for ideas, then create your own.

Well, that is it for today. I hope this has given you some ideas or at least, food for thought.

Till next time,

May God Bless and Watch Over You and Yours.


Tuesday, February 25, 2020


The Pink Magnolia…


FYI: The Magnolia is a large, graceful in appearance but an extremely sturdy flower. There are more than 200 species of this ancient blossom. Did you realize it is pollinated by beetles?

I have always associated the Magnolia with graceful, old southern plantations or lining the banks of a slow moving river. When I moved to Michigan from Virginia, I was pleased to see this lovely flowering tree in so many yards.

Todays project is my interpretation of a Pink Magnolia. Hope you will take a look at my video on the Let’s make Cards Group site dated Feb. 25th. (https://www.facebook.com/groups/361915864450400/about/)

Products uses:
Stamp: Stampin’ Up’s: Good Morning Magnolia set 1 of 2. 

Ink: Distress Ink: Pumice Stone

Colored Pencils: Prismacolor:  Ginger Root, Jasmine, Light Peach, Light Umber, Marine Green, Olive Green, Pink Rose, and White

Photo of todays demo:

  
Thank you for dropping by. It is always a pleasure having you visit. Your comments are welcomed.

Till next time,

God Bless


Tuesday, February 18, 2020


Hand-Painted Card Fronts…


The other day, while sorting through my “sent-card” files, I was surprised by the number of hand-painted cards that I have done over the years. For me, having the freedom to create with a brush was always so relaxing. A few of the cards that I’m showing today, were finished during an extremely difficult time in my life. During a 5 month period, I was battling heart problems, a second cancer and the decision to amputate my arm. For solace, I created cards and painted a wall mural.


At present, I am working on ideas to incorporate my unusual acrylic painting style with accents using Pan Pastels. This will probably happen within the next two months.


Meanwhile, please take a look at my past passion and let me know what you think…and yes, it is mostly what I call my fantasy brush work. 


Till next time, I hope you will explore all creative avenues.


May God Bless You and Yours…

Saturday, February 15, 2020


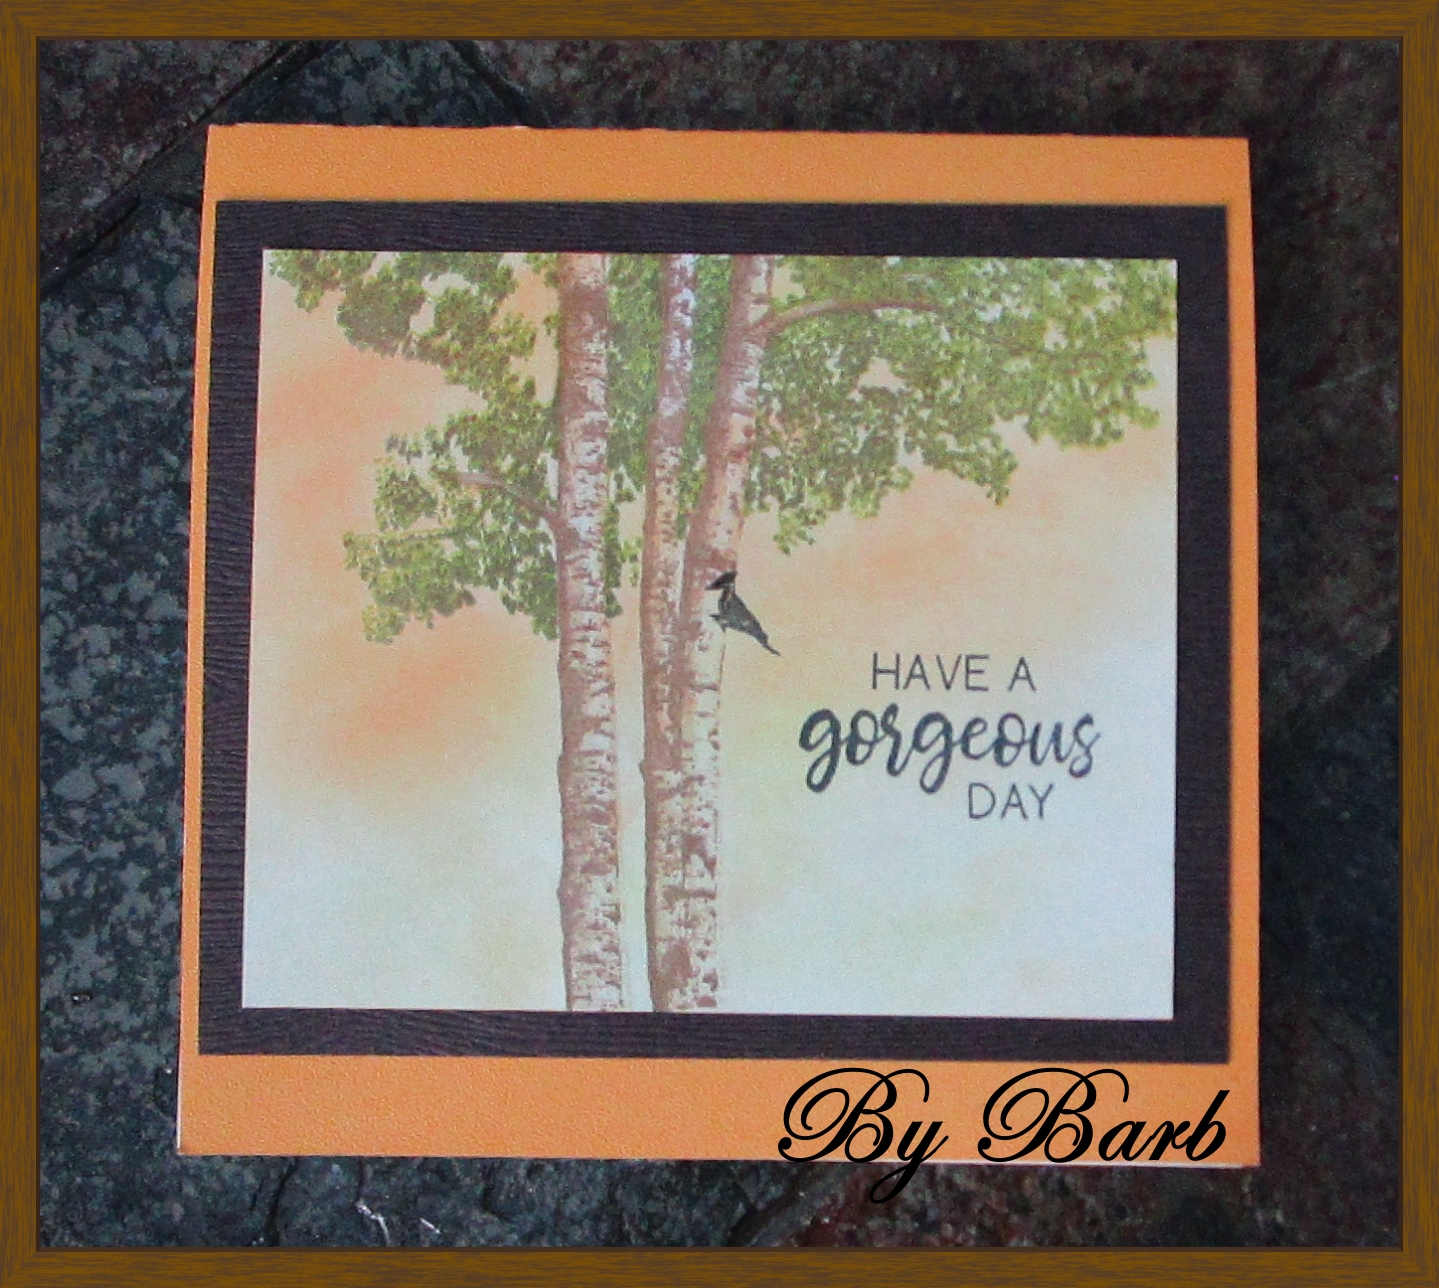
The Birch Tree…

I want to share that it’s a beautiful morning here in Michigan. The sky is, in all reality, a new color today – blue, a lovely dark baby blue – not gray. And there is a two-million-watt light bulb brightening up our diamond-like sparkling snow.

Well that has nothing to do with my project today but, as I said, I just wanted to share.

We did something that is rather new for me. I’ve had a few people ask that I demo how to do a multi-layer stamping. Because they are almost 300 miles from us, I decided to do a video and to share it with you on our FB site - Let’s make Cards.


Video oops! Envelope size is 6 ½” Sq, not 8 ½”


Oh well!  Please, feel free to take a look and hopefully join us. We are inviting and encouraging card-crafters from beginners to pros to share their works with us.  

Please remember, we are a “family-friendly” site.


Materials:
Stamp: Birch Tree by Kitchen Sink Stamps
Gina K Design Dye Inks – Warm Cocoa, Sandy Beach, Kraft, Dark Sage, Jelly Bean Green, and Key Lime
Pan Pastel’s – Diarylide Yellow and Orange
Brush – Ecotools: Large Shadow
Stampin’ Up’s Stamparatus


Till next time – God Bless